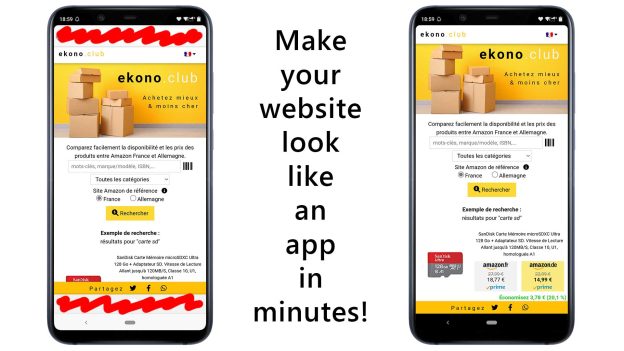
“Why would I even want to do that?”, you might ask. To me, there are a couple of big advantages:
- You can maximize a smartphone’s screen real-estate by getting rid of the address bar and toolbar that are on top and bottom of the browser.
- Your website loads in a separate window, not as a tab in the browser, which makes it really stand out.
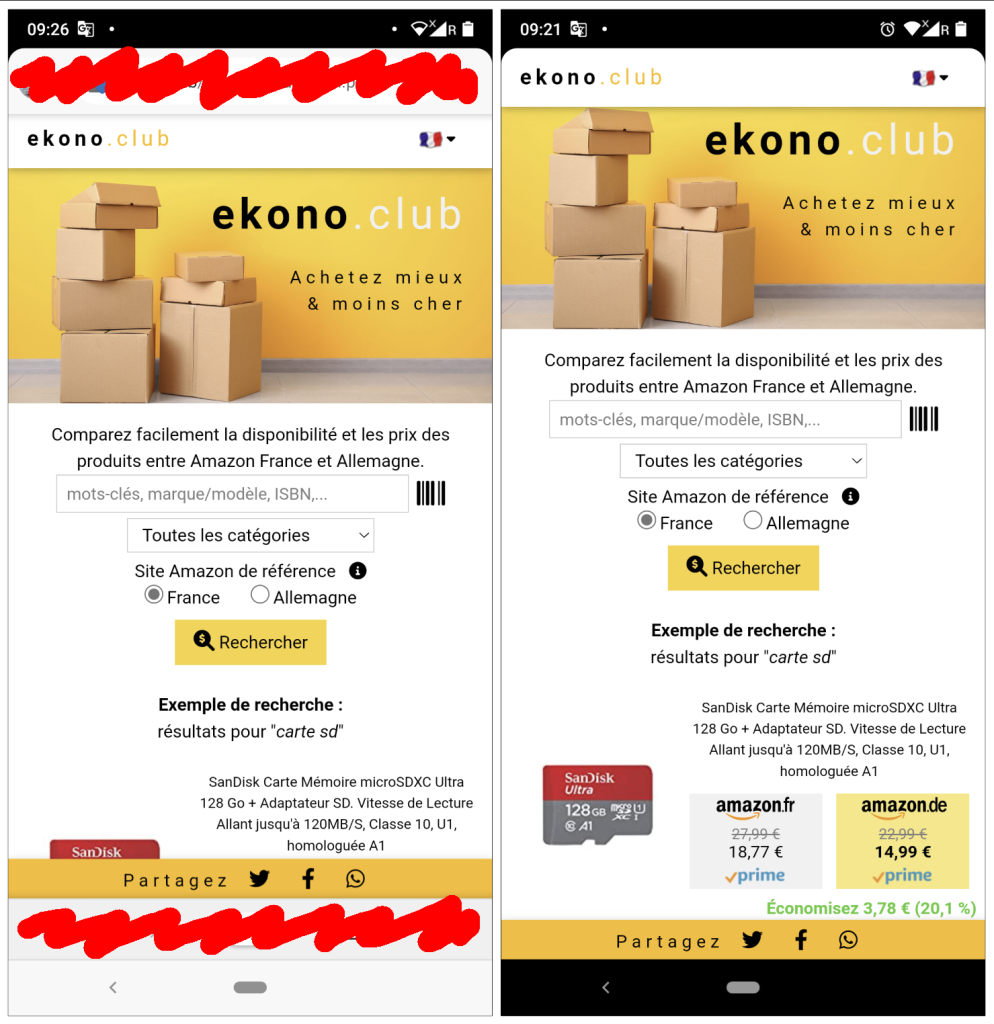
A better user experience improves retention, and while it’s clearly not absolutely necessary, I think many websites could benefit from this method. Also, it can be applied to any website. Indeed, it does not require it to be a fully-fledged PWA (Progressive Web App) with offline functionality.
I’ll explain the basic concept and how to do it in a custom-built website, then show you how it can be applied to a WordPress blog (the method will be similar for other blog platform).
Before I continue, let’s be clear: the method described in this article is a great way to very quickly and easily make your website look like an app in its own stand-alone window when it’s launched from the home screen, but keep in mind it does not magically transforms a simple website into an app. Unless specific offline functionality is programmed, it won’t be accessible when you don’t have internet access, no matter how you view it 😉
Installing a website as an app
First of all, let me emphasize that, of course, your users have to add your website to their home screen to see it like an app, and it’s up to you to tell them to do so. If they keep accessing it only in a browser (or add it to the home screen without the steps explained below), they’ll see it as usual in a browser tab.
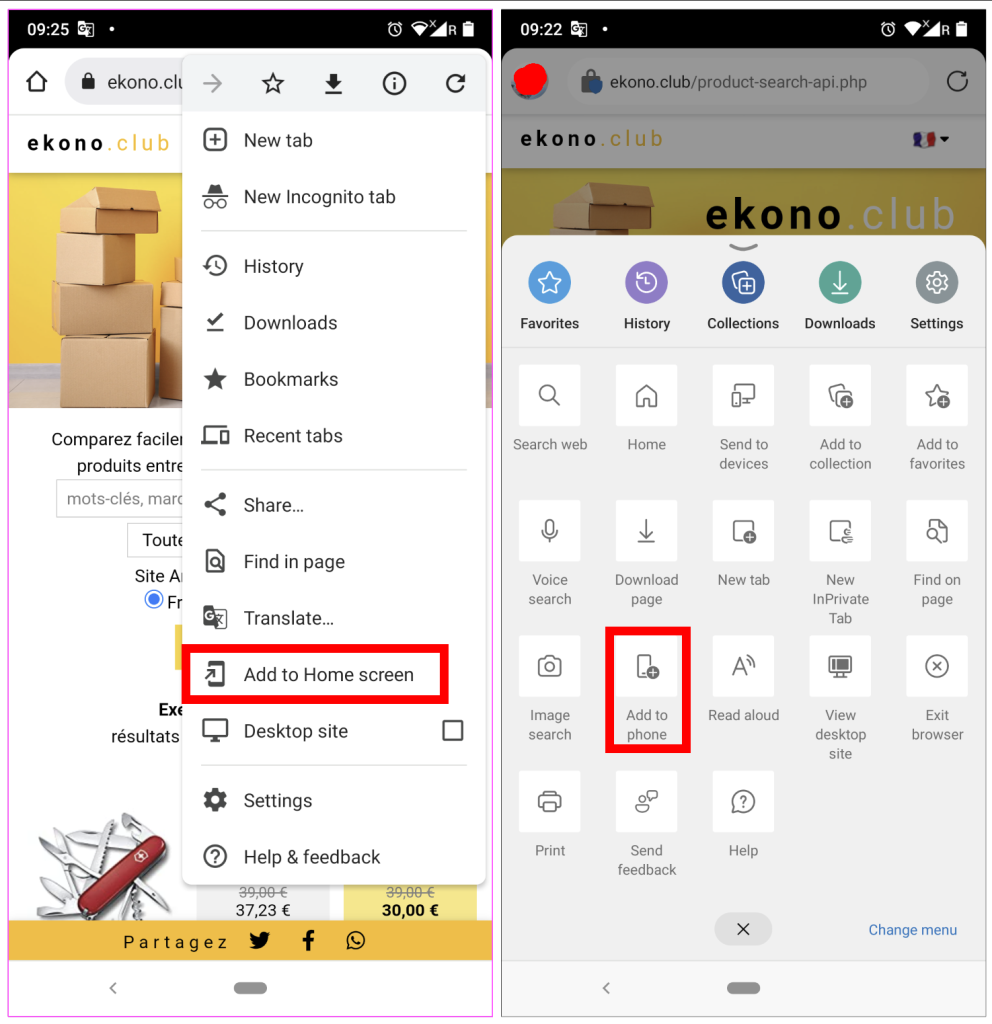
The exact way to add a website to the home screen depends on the OS and browser, but it’s always more or less similar. For instance, in Chrome on Android (left), tap the 3 dots button on the top right and select “Add to home screen”. In Edge (right), the 3 dots are at the bottom and the option to select is called “Add to phone”.
That said, it’s not very difficult to automatically show an “add this to your home screen” button to nudge your visitors, but that is beyond the scope of this article, so it’ll be for another one 😉
Custom-built website
To instruct the browser to treat the website as an app, you need to create a file (called manifest) but you don’t need to develop an actual PWA to take advantage of this capability.
You can create the manifest file in your favorite text editor and save it with the filename manifest.webmanifest. As sample content, here what I’ve used for my website https://ekono.club
{
  "background_color": "white",
  "description": "Compare prices between Amazon France & Germany",
  "display": "standalone",
  "icons": [
    {
      "src": "/assets/images/icons-192.png",
      "type": "image/png",
      "sizes": "192x192"
    },
    {
      "src": "/assets/images/icons-512.png",
      "type": "image/png",
      "sizes": "512x512"
    }
  ],
  "name": "Buy better & cheaper",
  "short_name": "ekono.club",
  "start_url": "/product-search-api.php"
}
background-color will set the background of the screen while the standalone browser window is loading, and will not affect your website’s design. For a better look, it should set it to a color that matches your website’s color scheme.
display can have one of four values: fullscreen (not even the notification icons are displayed), standalone (notification icons are displayed), minimal-ui (some interface elements, vary depending on the browser) or browser (full browser UI; there’s no point in using this if you want your website to look like an app!)
Only one icon is required, with a minimum size of 192×192 pixels, but it is standard practice to add another one (512×512 pixels) for when the browser needs a higher resoution icon.
short_name is the “app” name
name will be shown at the bottom of the loading screen.
description will appear as “app” details, depending on the browser.
start_url is the page that is loaded when the “app” is launched.
The order of those values doesn’t matter, as long as the data is well formatted (JSON).
There are many more optional values that can be set in the manifest file. For a complete reference, take a look at Web app manifests | MDN (mozilla.org).
Upload manifest.webmanifest file to your website’s top-level directory (using an FTP client or through your control panel’s file manager) and link it to your pages, with the following line in the <head> section:
<link rel="manifest" href="/manifest.webmanifest">Now, when a user visits a page that has this code and chooses “add to homescreen” (or similar, depending on the browser) in the browser’s menu, the ‘app’ icon will be created. Click on it and your website loads in its own window.
WordPress website
For WordPress or other blog, requirements are not different. You just need to create the manifest file as explained above and link to it in the <head> section. The latter is the what take a bit more work.
One option is to edit your theme. There are many tutorial on how to do it and it’s not difficult, but I don’t like it because changes could be undone when updating the theme. Even if that’s not the case, you’ll have to do it again if you ever decide to change your theme.
I prefer to set it up just once and then forget about it, and for that I’ll use a plugin. There are probably many plugins that allow to had elements to the <head> section, but personally I use Advanced Ads. I know, I know… it’s made for ads, but that’s not the point. It’s free, very easy to use, and allows you to add custom code site-wide in seconds (such as the ‘buy me a coffee’ box below 😉 ).
Once you have installed Advanced Ads plugin, create a new ad. The name doesn’t matter, just choose something useful to you. Leave the default “plain text and code” option selected and write the linking tag as content, then save it (“Publish” button).
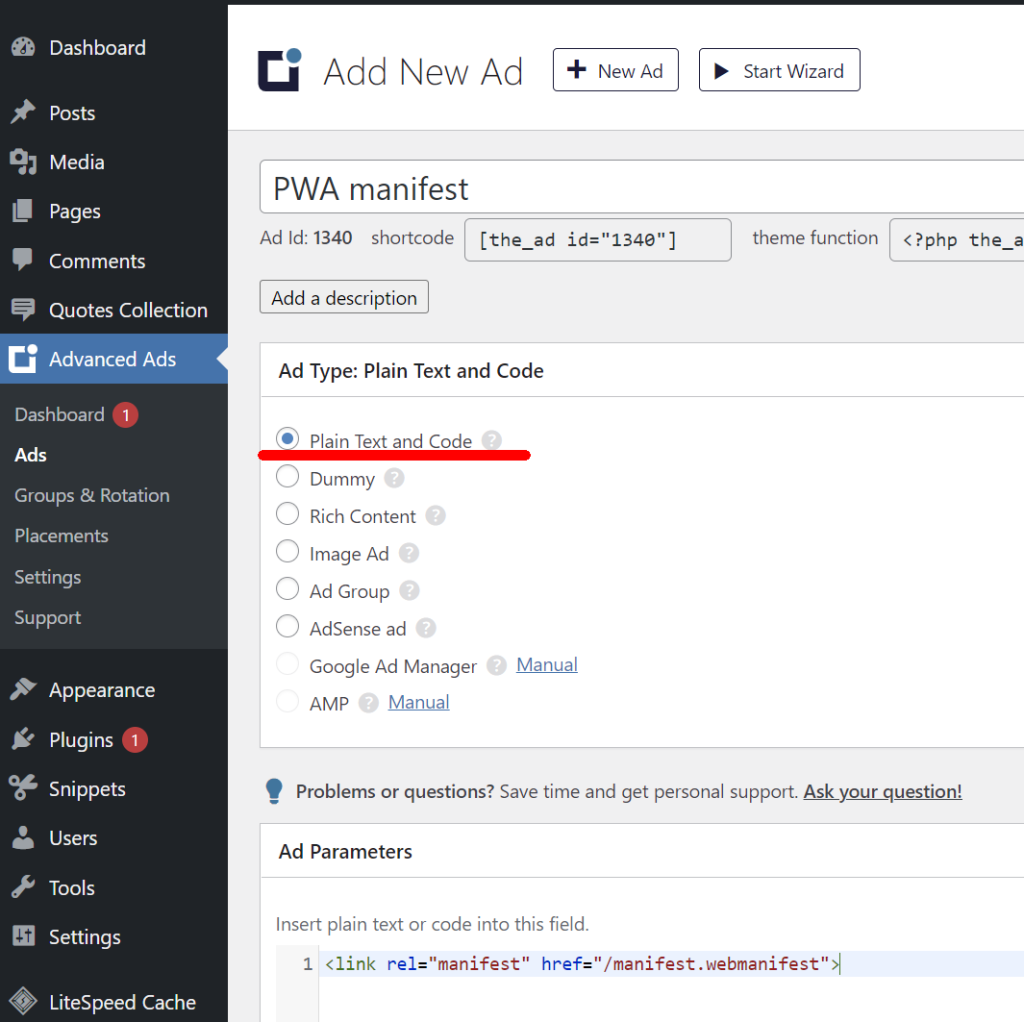
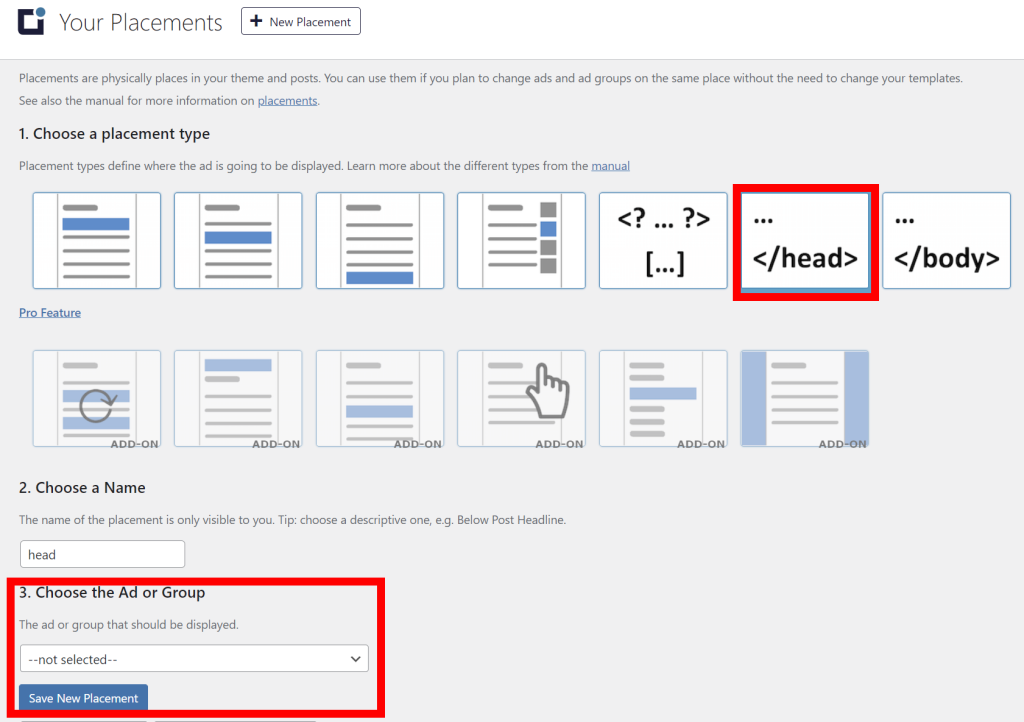
Then, click on Placements in the Advanced Ads menu, , select on the </head> placement. Type a name and in the step 3, select the ad you have just created to link the manifest. Then save the placement.
That’s it, you’re all set! Or that’s what one would think…
Actually, it doesn’t work. But why?
The issue is redirection. By default, all traffic to a blog is redirected to, well, the blog. If you enter the URL to a page that doesn’t exist, for instance, it will take you the the blog’s 404 page, not to your server‘s default 404 page.
When your browser tries to read manifest.webmanifest file, it can’t find it, because that is not the URL of a blog post, so it’s redirected to the error page.
We could try to mess with the redirection settings in the .htaccess file, but honestly, I don’t want a headache, and maybe you don’t even know what an .htaccess file is.
Instead, we’ll take the easy route and figure out if there’s a folder within the WordPress file structure, where content can be reached directly. The most obvious place is, you’ve guessed it, wp-content (where images and other uploaded files are stored).
So, move your manifest file over to wp-content and then edit the ad to reflect that change:
<link rel="manifest" href="/wp-content/manifest.webmanifest">Refresh your blog and add it again to your home screen. Now the browser can read the manifest and treats the blog as an app when adding it to the home screen.
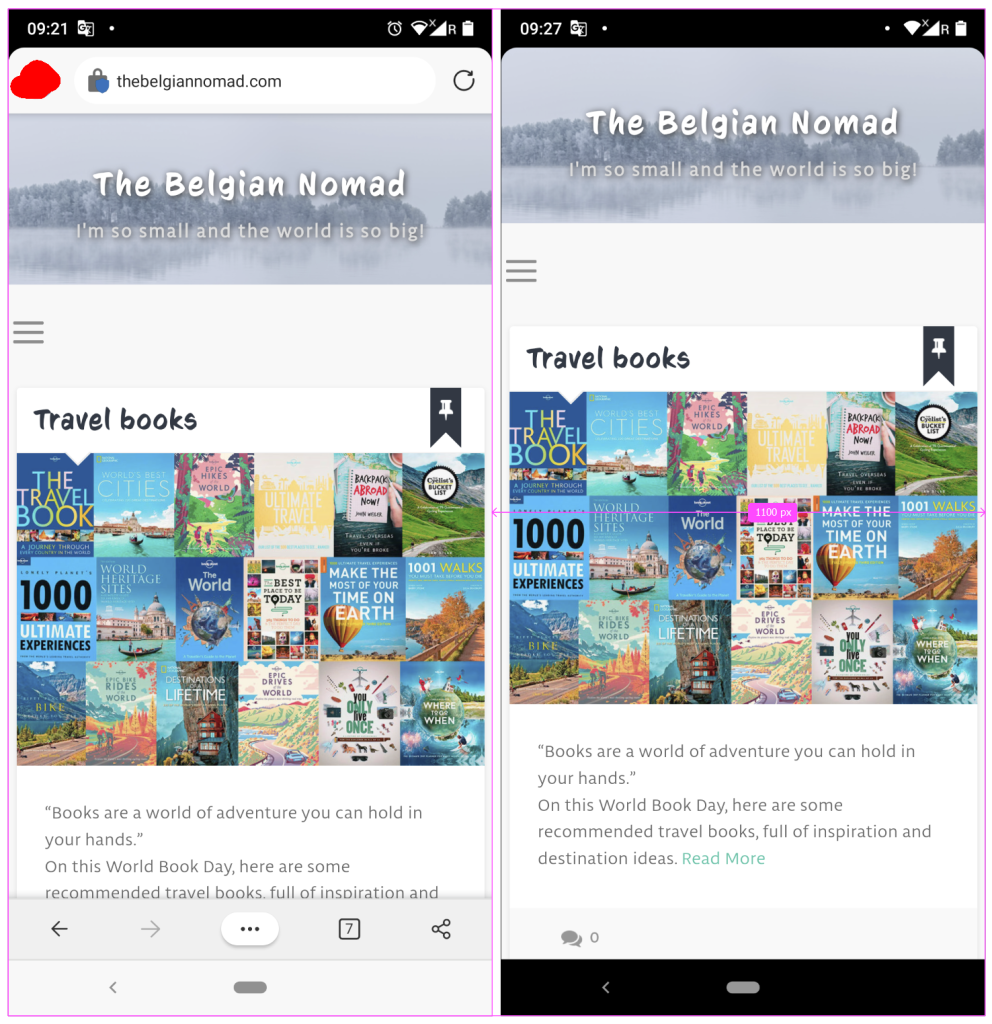
You can see it in action at http://TheBelgianNomad.com blog. FYI, there I’ve used the following manifest file:
{
  "background_color": "white",
  "description": "I'm so small and the world is so big",
  "display": "standalone",
  "icons": [
    {
      "src": "/thebelgiannomad.svg",
      "type": "image/svg+xml",
      "sizes": "512x512"
    }
  ],
  "name": "The Belgian Nomad",
  "short_name": "@TheBelgianNomad",
  "start_url": "/"
}
You’ll notice the use of an SVG (vector) icon, as well as “/” as start_url (i.e. same as typing only the domain name without any specific page.
Too easy to not do it
As you’ve seen, it is extremely easy to implement, both on custom-built websites and on a blog platform.
In my opinion, the improved user experience (more screen space) and attention grabbing (Who, besides The Belgian Nomad, do you know has a blog app?!) is well worth the small effort, even if in the end only a fraction of your visitors take advantage of it.
As always, questions and comments are welcome! Feel free to leave them below.
